Ensuring your air conditioning system is in top shape is crucial in Arizona. One often overlooked maintenance task is cleaning condenser coils on your outdoor systems, both before summer hits, and when summer storms have passed. These exterior condenser coils play a vital role in heat exchange, and when they’re dirty, your AC unit has to work harder, leading to increased energy bills and potential breakdowns. In this post, we’ll walk you through the process of cleaning your outdoor condenser coils safely and effectively.
Why Clean Your Condenser Coils?
Before we dive into the how-to, let’s briefly touch on why this task is important:
- Improved efficiency: Clean coils allow for better heat transfer, making your AC more efficient.
- Lower energy bills: An efficient AC uses less energy, saving you money.
- Extended lifespan: Regular maintenance can help your AC unit last longer.
Now, let’s get into the cleaning process.
Step 1: Disconnect the Power
Before you start any work on your AC unit, it’s crucial to cut off the power supply. This step ensures your safety throughout the cleaning process.
Locate your units whip disconnect (a small box mounted on the wall near your unit) and pull handle that disconnects the contacts. Your unit should be off now.
Alternatively, you can locate your breaker and cut power to the unit.
Always double-check that the unit is truly off before proceeding.
Step 2: Clear Out Debris
Next, you’ll want to remove any large debris around the unit:
- Clear away leaves, twigs, and other vegetation within a 2-foot radius of the unit.
- Trim back any overhanging branches or encroaching shrubs.
- Gently brush off any visible debris from the unit’s exterior.
Remember, be careful not to touch or bend the coils at this stage. They’re delicate and can be easily bent or damaged.
Step 3: Remove The Condenser Top
Some units allow for easy removal of the condenser top. If yours does:
- Look for visible screws or clips holding the top in place.
- Carefully remove these and lift off the top section.
- Set it aside in a safe place.
This step can allow for better access to the coils, but if you skip it, you will still be able to effectively clean your coils.
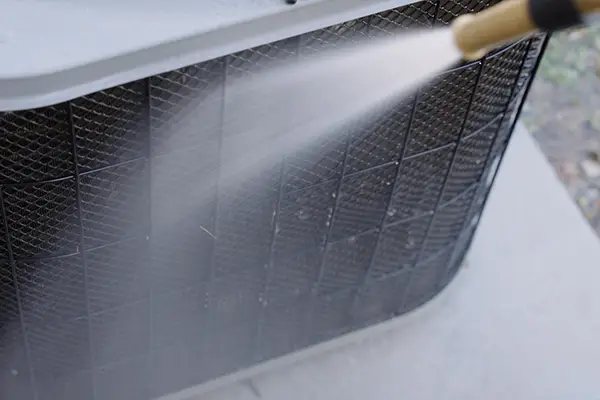
Step 4: Gentle Cleaning with a Garden Hose
Now comes the main cleaning:
- Use a regular garden hose with normal water pressure – avoid pressure washers or nozzle attachments that create a concentrated stream.
- Start at the top of the unit and work your way down, spraying at a slight angle (not straight-on) to avoid bending the fins.
- Be thorough, making sure to cover all sides of the unit.
- Pay special attention to areas where dirt and grime have built up, but resist the urge to scrub – let the water do the work.
- Continue until the water running out of the bottom of the unit appears clean.
Remember, the goal is to rinse away debris, not blast it off. Patience is key here.
Step 5: Let It Dry
After cleaning:
- Allow the unit to air dry completely. This usually takes about an hour on a warm day.
- If you removed the condenser top, now’s the time to replace it securely.
Step 6: Restore Power and Test The Unit
Once everything is dry and reassembled:
- Return to your circuit breaker box and switch the AC’s power back on.
- Or, if you used the whip disconnect, flip it back to the ‘on’ position.
Finally, test your newly cleaned AC:
- Turn on your AC and let it run for a few minutes.
- Check that it’s operating normally and producing cool air.
Congratulations! You’ve successfully cleaned your AC’s condenser coils.
How to Get The Most Out of Your AC
To keep your AC running smoothly between cleanings:
- Repeat this process twice a year, ideally in spring before heavy use begins and again in fall after the peak season.
- Keep the area around your outdoor unit clear of debris year-round.
- Consider a professional AC tune-up every few years for more thorough maintenance.
How do Professionals Clean Outdoor AC Coils?
While DIY cleaning is beneficial, professional HVAC technicians can provide a more thorough cleaning:
- They typically remove the top of the unit to access the interior.
- Using specialized equipment, they wash from the inside out, flushing dirt and debris outward.
- In cases of stubborn dirt and grime, technicians may use a special foaming chemical cleaner. This foam adheres to the coils, helping to break down and remove tough dirt from the fins.
- After applying the foam, they rinse thoroughly, ensuring all cleaning agents and loosened debris are removed.
- Some technicians may also straighten any bent fins using a fin comb, improving airflow and efficiency.
This professional-grade cleaning can reach areas that are difficult to access with a simple garden hose, providing a deeper clean and potentially improving your AC’s performance even further.
By following these steps and considering professional cleaning when needed, you’re ensuring your AC runs efficiently, potentially saving on energy costs and extending the life of your unit. Remember, if you’re ever unsure about performing maintenance yourself, it’s always best to consult with a professional HVAC technician. See our AC maintenance page for our plans.
If you’d like to know about the next step up in DIY AC maintenance, read our article on indoor evaporator coil cleaning. Stay cool and enjoy your newly efficient air conditioning system!